


Family Photography Tips: Shooting in Less-than-Ideal Lighting Conditions

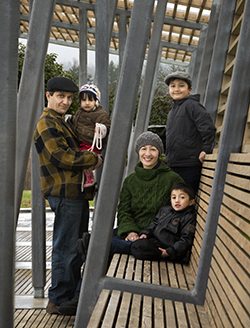
![]() You’ve heard of the paparazzi, but they can’t hold a candle to the mamarazzi. Many Vancouver moms find that, once they have children, they’re seized with a desire to chronicle their family’s lives through photos. Thanks to digital photography, this is easier than ever before. However, getting the best shots can be a challenge under less-than-ideal lighting conditions. We recently connected with Mary Jensen, a professional photographer here in the Vancouver area, and an instructor with Vancouver Photo Workshops, for some family photography tips. We asked our questions, she answered them, and we know that you’ll learn something by reading her words.
You’ve heard of the paparazzi, but they can’t hold a candle to the mamarazzi. Many Vancouver moms find that, once they have children, they’re seized with a desire to chronicle their family’s lives through photos. Thanks to digital photography, this is easier than ever before. However, getting the best shots can be a challenge under less-than-ideal lighting conditions. We recently connected with Mary Jensen, a professional photographer here in the Vancouver area, and an instructor with Vancouver Photo Workshops, for some family photography tips. We asked our questions, she answered them, and we know that you’ll learn something by reading her words.
Family Photography Tips: Dealing with Less-than-Ideal Lighting
How important is lighting to taking good-quality family photos?
Good lighting is of the first importance to all photography, and to good quality family photos, too. Correct exposure and good lighting mean that you can see lots of detail. If you have a large family that includes very little ones, it means you can see their faces clearly.
I would describe good light as having a direction to it, but not giving hard shadows. It’s soft, directional lighting. It’s certainly great for family photos! And having lots of light is good too, so that you can have an f-stop that will keep everyone in the front and in the back sharp. And so that you can have a shutter speed that won’t allow any blur in the image from movement. You want to keep your ISO down around 100 or 200, ideally.
What are the most common lighting problems that photographers encounter here in Vancouver?
 Actually, we have pretty good lighting here. If it’s not raining, that cloudy, overcast light we get so frequently in winter is wonderful for showing detail. That soft light means people don’t squint either, like they do in sun. You will likely have to work at a higher ISO than in summer so that you get a shutter speed that will freeze motion. You want to freeze both camera movement and the movement of any children (or ants-in-the-pants adults) that may be in the family. Sadly, the higher the ISO, the more noise we get in the photograph, and that’s not great. So choosing the lowest ISO that will give us a shutter speed that works is what we want.
Bright sunny days are a challenge because you need to coordinate the background (I mean find a nice one), with the light on their faces. If they face the sun, everyone will squint. If they turn their backs to the sun, you have to be careful with your exposure (camera settings) because it will be a back lighting situation. And if the light is coming in from one side, you get hard, dark shadows on the faces that isn’t very flattering, and can make it hard to really see people.
Inside, of course, is different. You have to use flash inside.
What are the pros and cons of using flash?
The pros of using flash are that you can be sure you have enough light — remember that having lots of light is foundational to the magical combination of sharpness (from f-stop and shutter) and detail in the photo. Sometimes the flash is just additional light, and sometimes it’s the main light in the picture. We use it as the main light source when we fire up the flash indoors, and the downside of that is that it gives shadows that aren’t so pretty.
If the flash is used outdoors, then it’s usually an additional light, with the sun being the main light source. We use it outside to reduce shadows the sun causes, usually, and there are no obvious flash shadows.
Do you have any family photography tips for compensating for less-than-ideal lighting conditions indoors?
If you’re indoors, I think you need to use flash. If you have only the pop-up flash, that’s fine. It will give you a faster shutter speed, to freeze movement, and should give you enough light for good exposure. Unfortunately, it will also give you those obvious ‘flash’ shadows. You can avoid those shadows by using an external flash, that is, one you purchase separately for your camera, and which is attached on the top of the camera. They can be used automatically, so you can just attach and go. You are also able to adjust their power, if you did happen to want to dial it down. When you have an external flash, you can aim it up to the ceiling and ‘bounce’ the light onto the group from the ceiling. Some light will be lost as you do this, so you will not want to adjust the power of the flash.
The other cool thing you can do is use video lights. They are great because you can see where the light will be. They are a continuous, bright, light that can shine wherever you aim it. The expensive ones will allow you to dial up or dial down the power, but even the more affordable ones can be useful for smaller groups. Of course, if you like to shoot video too, it’s a bonus because you will want to use the light for that as well. The only down side I can think of with video lights has to do with the colour of your photos. If you stick with AWB (auto white balance) you should be fine. Otherwise, try setting the camera to the light bulb icon (if you have it on your camera it’ll be labeled WB either on the body or in the menu).
Do you have any family photography tips for compensating for less-than-ideal lighting conditions outdoors?
Yes! Flash outdoors can be used cleverly to fill in the dark, heavy shadows that we can get on brightly sunny days. Often, just turning on the flash (I’m thinking of the pop-up flash) is enough to give you detail in the shadow area. And that’s true of both point and click cameras and dSLRs.
If you have arranged everyone so the light is behind them, you can use the flash to stop your subjects from all being silhouettes. Sometimes you have to ‘force’ the flash, because your automatic settings don’t think you need it. dSLRs have a button on the left side you can press to turn on the flash, and usually the point and clicks have a flash button which will give you choices of no flash at all, flash all the time, or the auto flash setting where the camera decides if you need it or not.
Professionals often use flash even on overcast days, and there’s no reason everyone can’t do that. But on overcast days you may not want all the flash your camera can deliver, as it will make the faces so bright they have no colour. On more sophisticated cameras you can ‘turn down the power’ of the flash. Try the -1 or -2 setting. You will find these controls in the menu, usually. You may even find that you want to use this kind of setting on a sunny day, if you’re very close to your subject. If you have your camera manual, look up flash exposure compensation.
[twocol_one]

How important is your equipment when you’re shooting in less-than-optimal lighting conditions?
The big thing about the camera equipment is the sensor size. If someone in the family has a dSLR, you should use that to take the group photo. That’s because the dSLR has a larger sensor than the little point-and-click cameras do. Some dSLRs have even bigger sensors (called ‘full-frame’) that professionals use to allow them to make wall portraits with fine detail and beautiful colour rendition. That sensor size business is all about how much data the camera is gathering. Lots of data means a great picture. It’s that simple. A correctly exposed image has lots of data, and that’s what makes it better. However, I don’t think it matters what brand of camera you have.
I think it’s always true that if you have good equipment – meaning well-made, and usually not the least expensive (but not necessarily the most expensive either) – you can do more: make better photographs, upgrade less frequently, even trade in equipment, sometimes.
I have to say that, really, what matters most in family pictures is expression. Having tons of great equipment isn’t as important as making the picture-taking fun for little kids, and the adults too. If the family is enjoying being together, and is relaxed and having fun, then the expressions will be there. They are what give great memories when you look back at the photos sometime in the future.
Thank you so much, Mary, for sharing your family photography tips!
 This article was sponsored by Vancouver Photo Workshops. Vancouver Photo Workshops was founded with the aim to serve and support the photographic community. Whether you are a true beginner, aspiring amateur or seasoned professional, our intimate and expansive classes are created with you in mind. Our workshops provide valuable insights into the essential theories of the art along with a strong focus placed on hands-on learning. “Photographing Children” is a three-session workshop made up of lecture, demonstration and in-studio shooting. Instructor Mary Jensen presents a new perspective on child photography and invites you to acquire the tricks of the trade. But don’t delay, because the first session is on Monday, April 22, 2013! No matter what your photographic interest, we have a workshop for you… Let us help you achieve your vision!